Larger size jpg images available here: 1920x1446 Full size: full size
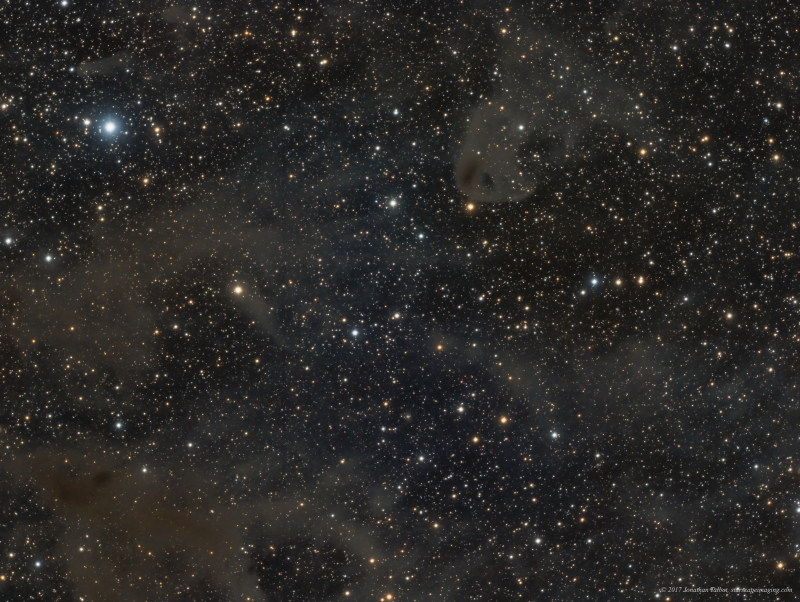
IC 360 region and LBN 777 “Baby Eagle Nebula”
About this object
This image is a small part of a very dusty region in the constellation Taurus with several interesting features. In the upper right is Lynds Bright Nebula 777, also called Barnard 207, the Baby Eagle nebula and the Vulture Head nebula. In this image it’s upside down but it’s relatively easy to see the resemblance to a head of a bird of prey. The dusty areas below it belong to a much large nebula called IC 360 which extends beyond the field of view. The brighter dusty region in the lower left part of the image is called Barnard 208. There are also a bunch of small galaxies in the image which at first are hard to see since they are so small. I’ve included an annotated image which lists these galaxies and the nebula. Most of the dust in this area is pretty faint so I had to aggressively stretch the image to show it.
This image is a small part of a very dusty region in the constellation Taurus with several interesting features. In the upper right is Lynds Bright Nebula 777, also called Barnard 207, the Baby Eagle nebula and the Vulture Head nebula. In this image it’s upside down but it’s relatively easy to see the resemblance to a head of a bird of prey. The dusty areas below it belong to a much large nebula called IC 360 which extends beyond the field of view. The brighter dusty region in the lower left part of the image is called Barnard 208. There are also a bunch of small galaxies in the image which at first are hard to see since they are so small. I’ve included an annotated image which lists these galaxies and the nebula. Most of the dust in this area is pretty faint so I had to aggressively stretch the image to show it.
Processing Steps:
This image was processing with PixInsight 1.8
Calibration: The batch preprocessing script was used to reduce and cosmetically correct the images and the corrected images were run through the blink tool to weed out the obviously bad images affected by clouds and then run through the subframe selector script to select the best subframes for further processing.
Registration and Integration: The selected images were then registered against a master using the registration tool and combined into master Red, Green, and Blue images using the image integration tool. Drizzle data was also output and the Drizzle tool was used to create the final RGB master frames. This effectively doubled the resolution to near 1.6 arcsec/pix. I also created a synthetic Luminance image by combining the master RGB drizzle images using the image integration tool but not selecting any data rejection.
The master frames were gradient corrected using the DBE tool and a RGB image was produced using the channel combination tool. The RGB image was run through the photometric calibration tool to correct the colors.
The RGB image was background neutralized using the background neutralization tool.
Noise reduction: Noise reduction was then performed on the Synthetic Luminance and RGB image using the multi scale linear transform tool after which the images were stretched using the histogram tool. A second round of noise reduction was done on the stretched images using the TGV noise reduction tool using a mask to protect bright high signal areas and stars.
LRGB creation: I created the Syn LRGB image using the LRGB tool.
I readjusted the histogram after creating the LRGB image setting the black point just prior to any clipping.
The background enhancement script was then used in several iterations to brighten the dim background dust and enhance the nebula regions.
Several iterations of curves was then performed to further enhance the dust using the large scale mask output from the background enhancement script.
Another round of noise reduction was used using the ACDNR tool along with a star mask to further smooth the image along with several more iterations of curves.
SCNR was performed to get rid of some of the background green noise
Star reduction: A star mask was produced and used with the morphological transform tool to slightly reduce the contribution of the stars allowing the background dust to be a bit more prominent.
Several iterations of curves were used with the star mask in place to increase the star color saturation.
I probably could enhance the background dust even more but since I only took RGB exposures, I didn’t want to enhance the noise in the image. This is a good image where dedicated luminance exposures would have helped.
Image Details
- Optics : Stellarvue SV 70T triplet refractor
- Mount: Paramount MYT
- Camera: QSI 583
- Filters: Astrodon E series RGB
- Exposure: RGB: 300:300:340 Bin 1x1 Total: 15hrs 40min
- Camera/Mount Control: The Sky X, CCD Auto Pilot 5
- Guiding: Unguided using ProTrack
- Processing: PixInsight 1.8,
- Location: Stark Bayou Observatory, Ocean Springs, MS
- Date: Sep/Oct 2017


